


Technology Tips
Make Technology Use Easier
 Launch the media gallery 1 player
Try using four random words run together as a password instead of trying to use random letters, numbers, etc. in a shorter password. It's usually much easier to remember and is also generally more secure.
xkcd - Password Strength
http://xkcd.com/936/.
Previous Tips:
54) Hold the <Alt> key to select text within a Hyperlink.
53) Press <Ctrl>&<Shift>+<T> to quickly reopen a closed tab in your web browser.
(It can also reopen all tabs if you accidentally closed the browser window.)
52) Use the website fast.com to quickly and simply test your Internet speed.
51) In Microsoft Word use <Shift>+<F3> to quickly toggle the selected text from Upper-case to Lower-case to First letter capitalized.
50) To select text by word instead of by character double-click the first word and hold on the second click. Now when you drag the mouse it will automatically select by word.
(You can also automatically select whole paragraphs by triple-clicking.)
49) To quickly rename a selected file try pressing the F2 key.
(This also works with a group of selected files and will append a sequential number to the end of each.)
48) In Outlook you can setup a rule to delay your sent email so if you sent a message by mistake you can just delete it from the Outbox. In the 'Rules and Alerts...' section of Outlook create a new rule. From blank rule choose Apply or Check messages I send or after sending. Skip the Select conditions section and select defer delivery by a number of minutes then choose the number of minutes you wish to delay the message.
If you wish certain messages to be sent immediately you can apply the 'except if' condition and specify something like '...if subject starts with "!" or similar and modify the message appropriately to bypass the delay.
47) Use <Ctrl + Delete> or <Ctrl + Backspace> to delete an entire word instead of just a single character.
46) To quickly lock your workstation, use the Windows Logo Key  + L.
+ L.
45) For scrolling down a web page, it is possible to use the mouse to drag the scroll bar down the page. However, it might be quicker to use the spacebar. Tap the spacebar to scroll down a page. Use Shift+spacebar to scroll up.
44) Most people know that Task Manager can be opened by using this key combination: Ctrl+Alt+Del
What they may not realize is that there is a shortcut for this shortcut.
The simple shortcut Ctrl+Shift+Esc takes users straight to Task Manager—without any intermediary steps or additional clicks.
Task Manager
43) This tip might be useful for people who use multiple monitors. It is possible to multitask with multiple monitors by using the Windows logo key
Picture of the Windows logo key+Shift+Right Arrow or Left Arrow. Using this key combination will quickly shift the open window to the other monitor.
42) Most people know that Google is a search engine that can help locate information on the internet. What they may not realize is that it can also be a quick dictionary. To get a dictionary entry for a word, just type "define" and then the word in the search box. See the example below:

41) Move right, not down
In Excel hitting Enter usually shifts the Excel cell pointer to the cell below. If users would rather move to the right, that is possible. Go to the Office button in the upper left, select Excel Options, and then select Advanced. Under Editing options, the first choice is After pressing Enter, move selection. Pick a direction to change from Down which is the default.
40) With the release of iOS 7, there have been many changes to Apple devices. One of those changes is that it is now possible for iOS 7 users to adjust fonts.
Access the text size properties under Settings > General > Text Size. Here users can adjust the reading size of fonts by dragging the slider, and apps that support the feature will adjust to the preferred size. While every app doesn't support this right now, many may in future versions.
39) Use the following shortcut to minimize numerous open windows at the same time in order to view the desktop quickly. Hold down the Windows logo key and press D.
38) Here is a quick tip for Excel. By default, a new workbook contains 3 worksheets. While it is possible to add or delete sheets, it is also possible to set a certain number as the default by doing the following:
1. In Excel 2007, click the Office button and then click Excel Options.
2. Click Popular in the left pane.
3. In the When Creating New Workbooks section, enter the number of sheets in the Include This Many Sheets field.
4.Click OK.
37) iPads have become very popular devices. Here is a quick tip for how to take a screenshot using an iPad. Hold the Sleep/Wake button and Home button to take a screen shot. The screen will flash, and a camera click will be heard if the volume isn't muted. The screenshot will appear in the Photo app's camera roll.
36) All versions of Microsoft Office have a default location for the Save As option. To change the default location in any Office 2007 application, click the Office button and choose Options then Save. In Word, users can choose Browse to find and specify a new default file location. In other Office applications, the drive path must be copied and pasted from Windows Explorer.
35) Windows users who drag an icon from one folder into another by using the right mouse button instead of the left button will end up with a menu like this one:
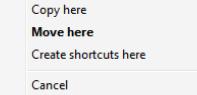
This allows users to quickly make copies or shortcuts of items without having to do any other steps. Windows usually moves files from one place to another when they are dragged. Dragging files with the right mouse button provides more options.
34) Outlook users may appreciate the following keyboard shortcut. To create a new appointment in any of Outlook's views, push Ctrl + Shift + A.
33) Windows 7 has many keyboard shortcuts that can make common tasks quicker. Hold down the Windows key ![]() and press M to minimize all windows. To restore all windows, hold down the Windows key
and press M to minimize all windows. To restore all windows, hold down the Windows key ![]() and press Shift + M. The Windows key
and press Shift + M. The Windows key ![]() is located between the Ctrl and Alt keys on most keyboards.
is located between the Ctrl and Alt keys on most keyboards.
32) There are a number of keyboard shortcuts in Word that can save time when formatting text. Here are two that might be worth a try.
Ctrl + ] Increases the size of the selected text by 1 point.
Ctrl + [ Decreases the size of the selected text by 1 point.
31) In Windows 7 the taskbar icons have keyboard shortcuts. To open these applications through shortcut keys, simply hold down the Windows key ![]() and press the number on the keyboard that corresponds with the icon. Count from left to right working from the Start button to the right. For example, if Internet Explorer is the first icon, press Windows
and press the number on the keyboard that corresponds with the icon. Count from left to right working from the Start button to the right. For example, if Internet Explorer is the first icon, press Windows![]() +1 to open it. If PowerPoint is the fifth icon, press Windows
+1 to open it. If PowerPoint is the fifth icon, press Windows![]() +5
+5
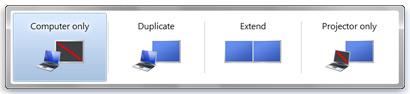
30) Windows 7 makes it easier to connect to a multimedia projector or second monitor. Begin by clicking the Start button. In the search box, type projector, and then click Connect to a Projector. (To use a keyboard shortcut instead, press the Windows logo key ![]() +P). Then select how the desktop should be displayed:
+P). Then select how the desktop should be displayed:
Computer only (This shows the desktop only on the computer screen.)
Duplicate (This shows the desktop on both the computer screen and a projector.)
Extend(This extends the desktop from the computer screen to a projector.)
Projector only (This shows the desktop only on a projector.)
29) It is possible to have more than one clock on the notification area. People who work with colleagues in other time zones can display clocks for each of those regions. Click the clock in the notification area and choose Change Date and Time Settings. Select the Additional Clocks tab to display as many as two other clocks and to set their time zones.
28) Alt + F4 closes the active window in the Windows OS. This may not seem like an important feature given all the other ways to close an application--clicking the X in the upper right hand corner, going to File and choosing Close or Exit, etc. However, it can be important if users run into problems with a suspicious web site or a pop-up window with no visible option for closing it. In those cases and others, Alt + F4 can be a useful way to close problematic windows.
27) The Windows 7 operating system is being adopted by more and more users. Those users will be able to utilize a variety of shortcuts and tips to save time and work more efficiently. Here is one example:
Use the Windows key ![]() + Tab to access the Windows Flip 3D and cycle forward through open programs.
+ Tab to access the Windows Flip 3D and cycle forward through open programs.
Use the Windows key ![]() + Shift + Tab to access the Windows Flip 3D and cycle backward through open programs.
+ Shift + Tab to access the Windows Flip 3D and cycle backward through open programs.
26) In Excel, the Ctrl key can be used for quick navigation around a spreadsheet. Most people know that Ctrl + Home will take them to the upper leftmost cell. However, fewer people realize that the Ctrl and arrow keys can be used together to move around quickly. Pressing Ctrl and an arrow key (up, down, left, or right), will take the user to the last populated cell in that direction.
Bonus Tip: Holding down the Shift key while using the Ctrl + arrow key combination will select all the cells included in the jump.
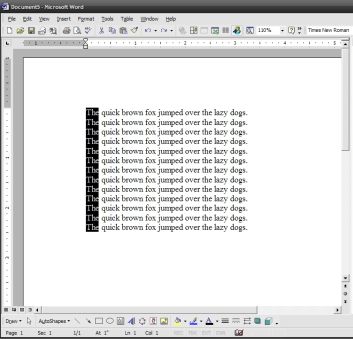
25) Here is an easy keyboard shortcut for adding or removing a space above the current paragraph when using Microsoft Word.
Ctrl + 0 (zero) To add or remove a space above current paragraph.
For example:
The quick brown fox jumps over the lazy dog. The quick brown fox jumps over the lazy dog. The quick brown fox jumps over the lazy dog. The quick brown fox jumps over the lazy dog. The quick brown fox jumps over the lazy dog.
The quick brown fox jumps over the lazy dog. The quick brown fox jumps over the lazy dog. The quick brown fox jumps over the lazy dog. The quick brown fox jumps over the lazy dog. The quick brown fox jumps over the lazy dog.
Quickly changes to:
The quick brown fox jumps over the lazy dog. The quick brown fox jumps over the lazy dog. The quick brown fox jumps over the lazy dog. The quick brown fox jumps over the lazy dog. The quick brown fox jumps over the lazy dog.
The quick brown fox jumps over the lazy dog. The quick brown fox jumps over the lazy dog. The quick brown fox jumps over the lazy dog. The quick brown fox jumps over the lazy dog. The quick brown fox jumps over the lazy dog.
when the shortcut is used.
24) People who work in Outlook's calendar view may appreciate these keyboard shortcuts.
To get to the Outlook calendar from anywhere else in Outlook do the following:
[Ctrl]+2: Go to Calendar view from any other Outlook view.
[Alt]+1-9: Shows a view of a specific number of days, beginning with the selected day. For example, if May 2nd is selected and [Alt]+5 is used, the Calendar will display May 2-6. To display 10 days, use [Alt]+0.
23) Here is a useful keyboard shortcut that is also quick and easy. To lock the computer system that is being used, hold the Windows key (usually located between Ctrl and Alt) and push L. [Windows] + [L]
When the user logs back in, all programs will still be running and windows will appear just the way it was when the system was locked.
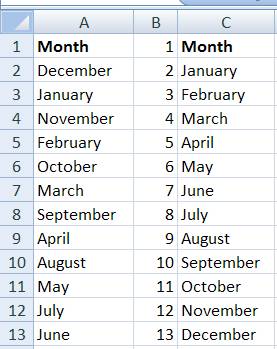
22) Custom Sorting Month Names in Excel
The ascending and descending sort options are powerful tools in Excel. However, these features don't always sort values in a familiar way. When this is the case, a custom sort is needed.
Months don't sort in a meaningful way when sorted alphabetically. In this case, Excel offers a custom sort.
Below, is the problem. When applying an ascending sort, the list sorts alphabetically instead of sorting by month order.
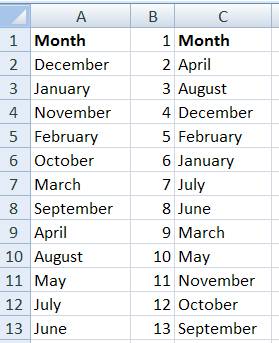
For Excel 2007 and 2010:
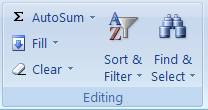
1. Click the Sort option in the Editing group.
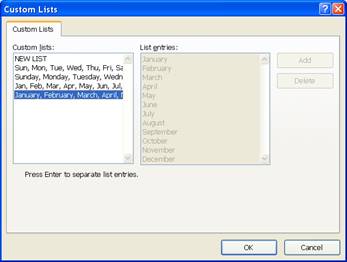
- In the resulting Sort dialog box, click the Order control's dropdown list and choose Custom List.
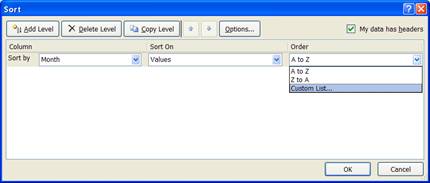
- Choose the appropriate list from the options.
.
- Click OK, and the months will be in alphabetical order.
21) In Outlook it is possible to change the default color of the calendar.
In Outlook 2003 and 2007, do the following to change this feature:
From the Tools menu, choose Options and click the Preferences tab (if necessary)
On the Preferences tab, click Calendar Options in the Calendar section.
In the Calendar Options section, choose a new color from the Default Color dropdown menu.
Click OK.
For Outlook 2010, do the following:
Click the File menu and then choose Options.
Click Calendar in the left pane.
In the Display Options section, choose a new color from the Default Calendar Color dropdown.
Click OK.
This property changes the Calendar color not the color of the selected day. Keep in mind that all of the calendars, not just Month view, will be updated.
20) PowerPoint provides a number of pre-defined backgrounds, but it is also possible to use a different image for a slide's background. PowerPoint allows this, and it's easy to repeat an image across a background.
Once an image file is created or located, it's time to insert it as follows for PowerPoint 2007:
- Right-click a slide's background and choose Format Background.
- Click the Picture or Texture Fill option.
- Click the File button (under Insert From).
- Use the Insert Picture dialog to locate the file. Select the file and click Insert.
- Click the Tile Picture as Texture option.
- Click Close to apply to the current slide. Click Apply to All and then click Close to apply to all the slides in the presentation.
It is possible to do the same formatting in PowerPoint 2003 it just takes a different approach:
- Right-click a slide's background and choose Background.
- Click the dropdown under Background Fill and choose Fill Effects.
- Click the Texture tab and then click the Other Texture button.
- Use the Select Texture dialog to locate the file. Select the file and click Insert.
- Click OK and then click one of the Apply or Apply To All.
To save the background as a separate file, right-click the background and choose Save Background.
19) In the last few years, there have been great changes in software that have made it easier to find, include, and spruce up the pictures in documents. Not only can people easily take a good photo and include it in a document, but they can also use Word 2007 or Word 2010 to edit the image and apply a variety of styles and special effects to make it look great on the page.
After adding a picture to the page, click it. Word will display a whole new set of tools. In the Picture Tools Format tab, will be everything needed to apply special effects (artistic effects, shadows, and more) to the image. Insert a picture, click on it, select Picture Tools Format, and experiment with the various options.
Below is an example of a photo that was edited with Word 2007.

18) In Office 2007 or Office 2010, there's a new mouse wheel feature. It can be used to move through the tabs on the ribbon.
To move to the right, hover the mouse over the ribbon or tabs and roll the wheel back.
To move to the left, hover the mouse over the ribbon or tabs and roll the wheel forward.
Roll slowly for the best effect.
At first this might not seem like a big deal, but eventually this feature will become a habit. It is an easy way to take a quick peek at the options on each tab. However, the Office button in 2007 and the File tab in 2010 are not in the cycle. These must be clicked to access those features and options.
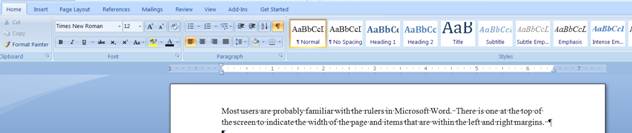
17) Most Office users are probably familiar with the rulers in Microsoft Word. There is one at the top of the screen to indicate the width of the page and items that are within the left and right margins.
In addition there is a ruler on the left side of the screen that measures the length of the page. However, many users are unaware that there is another view that offers still more information:
the distance between the edge of the paper and the margin
the distance between the selected tab and the left and right margins
It is easy to access the alternate view.
1) Left click on a margin or tab on the ruler and hold down the mouse button.
2) While still holding down the left mouse button, click the right mouse button.
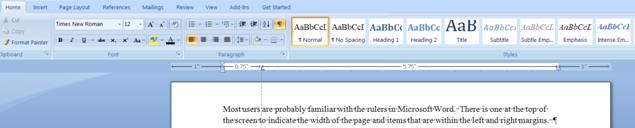
In the above figure, the alternate view shows the margins are both 1 inch, there is .75 inch between the left margin and the tab, and 5.75 inches between the tab and right margin.
16) The actual content of the PowerPoint presentation is much more important than the slide show template and color scheme used to deliver it. For some reason many people believe that every presentation must have a unique PowerPoint template for its slides even though it can take a long time to select and apply a template to a presentation. That time could be better spent ensuring the content is something appropriate for the audience and checking to see whether or not other rules against PowerPoint abuse have been violated.
15) Unless the audience is young children (in which case text-heavy slides should be avoided anyway), the participants probably know how to read. Too many presenters who use PowerPoint insist on reading every slide. Just as the purpose of PowerPoint is not to be a word processor, it is also not intended to be a type of teleprompter. The point of the presentation should be to explain information to people that they cannot read on their own or glean from the slides themselves.
14) PowerPoint was not created to be a word processing program. The purpose of PowerPoint is not to force as much information into a presentation as possible. The purpose of slides is to have reminders and images that stimulate thinking and participation by viewers. It may not even be necessary to have complete sentences. Simple statements work just fine. However, this is not an excuse for creating hard to decipher abbreviations or acronyms. Typos will detract from a presentation too. Always be sure to run spell check, but more importantly, PROOFREAD the presentation before delivering it.
13) PowerPoint has many features, but that doesn't mean they all must be used in the same presentation. For example, the fact that PowerPoint allows for bullet points is no reason to use them. It is likely that presenters can convey as much information using a picture as they can using a slide crammed full of bullet points. Next time, try this. Insert a picture in the slide instead of bullet points and talk about the picture. The audience will find it more interesting than hearing a list of points read to them.
12) Many times there is a valuable keyboard shortcut that can prevent users from having to search for something on the MS Ribbon or in menus. Here is one to try. To double underline the selected text use: Ctrl + Shift + D
11) To change the selected text to all CAPS, press Ctrl + Shift + A. This feature is also available, along with all the other Change Case options, in the Font section of the Home tab on the MS Office 2007 ribbon, but the shortcut may be quicker.
10) In Excel there are a variety of ways to format cells and input information. It usually takes just a few clicks using the menus or ribbon. However, it is also possible to format a cell or enter data using keyboard shortcuts.
To quickly enter the current date into a cell, press [Ctrl] + : and Excel enters the date in MM/DD/YYYY format. To test this, select a cell and press [Ctrl] + :.
9) Learning to use the Format Painter tool (which looks like a paintbrush in the Home tab of the Office Ribbon) in MS Office 2007 applications can save considerable time. To change new text (or cells in Excel), select the items that have the desired formatting, then click Format Painter. Next click and drag on the new items to apply the copied formatting to them.
Format Painter is usually a "once and done" tool. That means after clicking Format Painter and changing a section of text the reformatting will stop when the mouse is released. To reformat a number of unconnected items, double click Format Painter. Then the reformatting tool will continue changing items as long as they are selected. Pressing ESC will turn off Format Painter after it has been double clicked.
A nice feature of Format Painter is that it is not limited to only one formatting option at a time. For example, items that are bold, underlined, italicized, in a new font , etc. can have these attributes copied to new selections all at the same time.
8) Some of the best tips may be keyboard shortcuts that allow users to perform a task without using the mouse to navigate to a certain part of the screen.
To close the current or active window push CTRL + W.
7) Microsoft Outlook offers a variety of tools to manage email, schedules, and contacts. The key to using Outlook efficiently is find the customizations and shortcuts that fit people's work habits.
It's possible to save a few keystrokes when entering dates. When entering the start and due dates for a new task, it's not necessary to type the entire date. If a date is in the current month, simply enter the day. Outlook will enter the remainder of the date. If a date is not in the current month, Outlook will still save a few keystrokes by filling in the year. If the month and day haven't occurred, Outlook will use the current year. If the month and day have passed, Outlook will use the coming year.
6) To select vertically in Microsoft Office applications, hold the <Alt> key and drag the mouse cursor over the text. See the image below for an example:
5) Most Outlook users know that they can sort messages by clicking on the column title. Clicking toggles the view back and forth from ascending to descending order.
What these users may not know is that they are not limited to sorting a single column in Outlook. To sort by two columns (two categories), do the following. First, sort the primary column by clicking the column title. Next, hold down the shift key and click the column title of the secondary sorting category. The messages will be arranged according to the the columns selected. For example, clicking From and Size will arrange messages from the various senders in size order.
4) Outlook allows users to view their calendars in different formats. Without modification, the work week view displays Monday through Friday which is the traditional work week. If desired, include Saturday and Sunday in that view. Choose Options from the Tools menu. Then click Calendar Options in the Calendar section. In the dialog box, check Saturday and Sunday in the Calendar Work Week area.
Users who don't wish to have the traditional five or seven day work displayed can modify what is shown. Check the days of the week that apply to create a custom view. For example, people who work Tuesday through Saturday can check those days to create a work week that reflects their schedules.
3) As new versions of Excel have been released, new features have been added. There are many helpful tips that users may or may not know. Excel users will want to take advantage of this shortcut.
To select an entire Excel worksheet, click the gray/blue box in the upper left corner of the worksheet. It's the area to the left of the column letters and above the row numbers. With the entire worksheet selected, users can quickly and easily make changes to all cells.
There are other methods to select all the cells too. Keyboard shortcut people can press Ctrl A. Cells can also be selected by clicking and dragging over the needed cells.
2) In Windows, pressing the Shift+Delete keys will delete files or folders permanently without sending them to the Recycle Bin. Using the Shift+Delete key combination on any file or folder not in the Scheduled Task folder will result in the following message: "Are you sure you want to delete (name)?" Clicking Yes will permanently remove it without sending it to the Recycle Bin first.
1) Utilize the Undo Function--Press Ctrl + Z or select Undo from the Edit menu. Keep pressing Ctrl + Z to go back and undo the most recent editing changes that have been made. In Office 2007, the Undo button is located on the Quick Access toolbar in the upper left corner. The Redo Function does double duty with the new Repeat button.